In this post I will describe changes to the StackStorm database abstraction
layer which landed in StackStorm v3.5.0. Those changes will substantially
speed up action executions and workflow runs for most users.
Based on the benchmarks and load testing we have performed, most actions
which return large results and workflows which pass large datasets around
should see speed ups in the range of up to 5-15x.
If you want to learn more about the details you can do that below. Alternatively
if you only care about the numbers, you can go directly to the
Numbers, numbers, numbers section.
Background and History
Today StackStorm is used for solving a very diverse set of problems – from IT
and infrastructure provisioning to complex CI/CD pipeline, automated remediation,
various data processing pipelines and more.
Solving a lot of those problems requires passing large datasets around – this
usually involves passing around large dictionary objects to the actions (which
can be in the range of many MBs) and then inside the workflow, filtering down
the result object and passing it to other tasks in the workflow.
This works fine when working with small objects, but it starts to break when
larger datasets are passed around (dictionaries over 500 KB).
In fact, passing large results around has been StackStorm’s achilles heel for
many years now (see some of the existing issues -
#3718,
#4798,
#625). Things will still work, but
executions and workflows which handle large datasets will get progressively
slower and waste progressively more CPU cycles and no one likes slow software
and wasting CPU cycles (looking at you bitcoin).
One of the more popular workarounds usually involves storage those larger
results / datasets in a 3d party system (such as a database) and then querying
this system and retrieving data inside the action.
There have been many attempts to improve that in the past (see
#4837,
#4838,
#4846) and we did make some smaller
incremental improvements over the years, but most of them were in the range of a
couple of 10% of an improvement maximum.
After an almost year long break from StackStorm due to the busy work and life
situation, I used StackStorm again to scratch my own itch. I noticed the age
old “large results” problem hasn’t been solved yet so I decided to take a
look at the issue again and try to make more progress on the PR I originally
started more than a year ago (https://github.com/StackStorm/st2/pull/4846).
It took many late nights, but I was finally able to make good progress on it.
This should bring substantial speed ups and improvements to all StackStorm
users.
Why the problem exists today
Before we look into the implemented solution, I want to briefly explain why
StackStorm today is slow and inefficient when working with large datasets.
Primary reason why StackStorm is slow when working with large datasets is
because we utilize EscapedDictField() and EscapedDynamicField()
mongoengine field types for storing execution results and workflow state.
Those field types seemed like good candidates when we started almost 7 years
ago (and they do work relatively OK for smaller results and other metadata
like fields), but over the years after people started to push more data
through it, it turned out they are very slow and inefficient for storing and
retrieving large datasets.
The slowness boils down to two main reasons:
Field keys need to be escaped. Since . and $ are special characters
in MongoDB used for querying, they need to be escaped recursively in all the
keys of a dictionary which is to be stored in the database. This can get slow
with large and deeply nested dictionaries.
Those fields are also bad candidates for what we are using them for. Data we
are storing (results) is a more or less opaque binary blob to the database,
but we are storing it in a very rich field type which supports querying on
field keys and values. We don’t rely on any of that functionality and as
you know, nothing comes for free – querying on dictionary field values
requires more complex data structures internally in MongoDB and in some
cases also indexes. That’s wasteful and unnecessary in our case.
Solving the Problem
Over the years there have been many discussions on how to improve that. A
lot of users said we should switch away from MongoDB.
To begin with, I need to start and say I’m not a big fan of MongoDB, but
the actual database layer itself is not the problem here.
If switching to a different database technology was justified (aka the
bottleneck was the database itself and nor our code or libraries we depend
on), then I may say go for it, but the reality is that even then, such a
rewrite is not even close to being realistic.
We do have abstractions / ORM in place for working with the database
layer, but as anyone who was worked in a software project which has grown
organically over time knows, those abstractions get broken, misused or worked
around over time (for good or bad reasons, that’s it’s not even important for
this discussion).
Reality is that moving to a different database technology would likely
require many man months hours of work and we simply don’t have that. The
change would also be much more risky, very disruptive and likely result
in many regressions and bugs – I have participated in multiple major
rewrites in the past and no matter how many tests you have, how good are
the coding practices, the team, etc. there will always be bugs and
regressions. Nothing beats miles on the code and with a rewrite you are
removing all those miles and battle tested / hardened code with new code
which doesn’t have any of that.
Luckily after a bunch of research and prototyping I was able to come up with a
relatively simple solution which is much less invasive, fully backward
compatible and brings some serious improvements all across the board.
Implemented Approach
Now that we know that using DictField and DynamicField is slow and
expensive, the challenge is to find a different field type which offers
much better performance.
After prototyping and benchmarking various approaches, I was able to find that
using binary data field type is the most efficient solution for our problem –
when using that field type, we can avoid all the escaping and most importantly,
very slow type conversions inside mongoengine.
This also works very well for us, since execution results, workflow results,
etc. are just an opaque blob to the database layer (we don’t perform any direct
queries on the result values or similar).
That’s all good, but in reality in StackStorm results are JSON dictionaries
which can contain all the simple types (dicts, lists, numbers, strings,
booleans - and as I recently learned, apparently even sets even though that’s
not a official JSON type, but mongoengine and some JSON libraries just
“silently” serialize it to a list). This means we still need to serialize data
in some fashion which can be deserialized fast and efficiently on retrieval
from the database.
Based on micro benchmark results, I decided to settle down on JSON,
specifically orjson library which offers very good performance on large
datasets. So with the new field type changes, execution result and various
other fields are now serialized as JSON string and stored in a database as a
binary blob (well, we did add some sugar coat on top of JSON, just to make it
a bit more future proof and allow us to change the format in future, if needed
and also implement things such as per field compression, etc.).
Technically using some kind of binary format (think Protobuf, msgpack,
flatbuffers, etc.) may be even faster, but those formats are primarily meant
for structured data (think all the fields and types are known up front) and
that’s not the case with our result and other fields – they can contain
arbitrary JSON dictionaries. While you can design a Protobuf structure which
would support our schemaless format, that would add a lot of overhead and very
likely in the end be slower than using JSON + orjson.
So even though the change sounds and looks really simple (remember – simple
code and designs are always better!) in reality it took a lot of time to get
everything to work and tests to pass (there were a lot of edge cases, code
breaking abstractions, etc.), but luckily all of that is behind us now.
This new field type is now used for various models (execution, live action,
workflow, task execution, trigger instance, etc.).
Most improvements should be seen in the action runner and workflow engine
service layer, but secondary improvements should also be seen in st2api (when
retrieving and listing execution results, etc.) and rules engine (when
evaluating rules against trigger instances with large payloads).
Numbers, numbers, numbers
Now that we know how the new changes and field type works, let’s look at the
most important thing – actual numbers.
Micro-benchmarks
I believe all decisions like that should be made and backed up with data so I
started with some micro benchmarks for my proposed changes.
Those micro benchmarks measure how long it takes to insert and read a document
with a single large field from MongoDB comparing old and the new field type.
We also have micro benchmarks which cover more scenarios (think small values,
document with a lot of fields, document with single large field, etc.), but
those are not referenced here.
1. Database writes
This screenshot shows that the new field type (json dict field) is
~10x faster over EscapedDynamicField and ~15x over EscapedDictField when saving 4 MB field
value in the database.
2. Database reads
This screenshot shows that the new field is about ~7x faster
over EscapedDynamicField and ~40x over EscapedDictField..
P.S. You should only look at the relative change and not absolute numbers.
Those benchmarks ran on a relatively powerful server. On a smaller VMs
you may see different absolute numbers, but the relative change should be about
the same.
Those micro benchmarks also run daily as part of our CI to prevent regressions
and similar and you can view the complete results here.
End to end load tests
Micro benchmarks always serve as a good starting point, but in the end we care
about the complete picture.
Things never run in isolation, so we need to put all the pieces together and
measure how it performs in real-life scenarios.
To measure this, I utilized some synthetic and some more real-life like actions
and workflows.
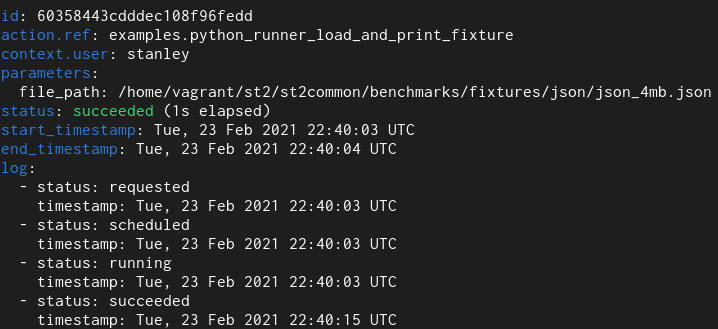
1. Python runner action
Here we have a simple Python runner action which reads a 4 MB JSON file from
disk and returns it as an execution result.
Old field type
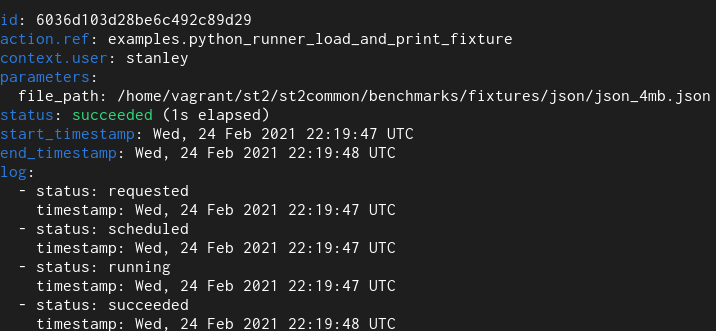
New field type
With the old field type it takes 12 seconds and with the new one it takes 1.
For the actual duration, please refer to the “log” field. Previous versions of
StackStorm contained a bug and didn’t accurately measure / reprt action run time –
the end_timestamp – start_timestamp only measures how long it took for action
execution to complete, but it didn’t include actual time it took to persist
execution result in the database (and with large results actual persistence
could easily take many 10s of seconds) – and execution is not actually
completed until data is persisted in the database.
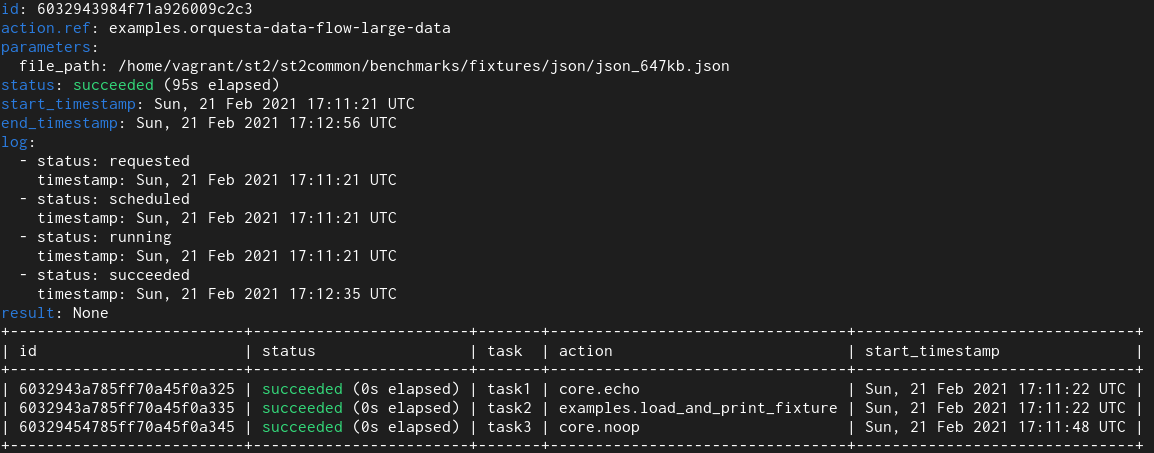
2. Orquesta Workflow
In this test I utilized an orquesta workflow which runs Python runner action
which returns ~650 KB of data and this data is then passed to other tasks in the workflow.
Old field type
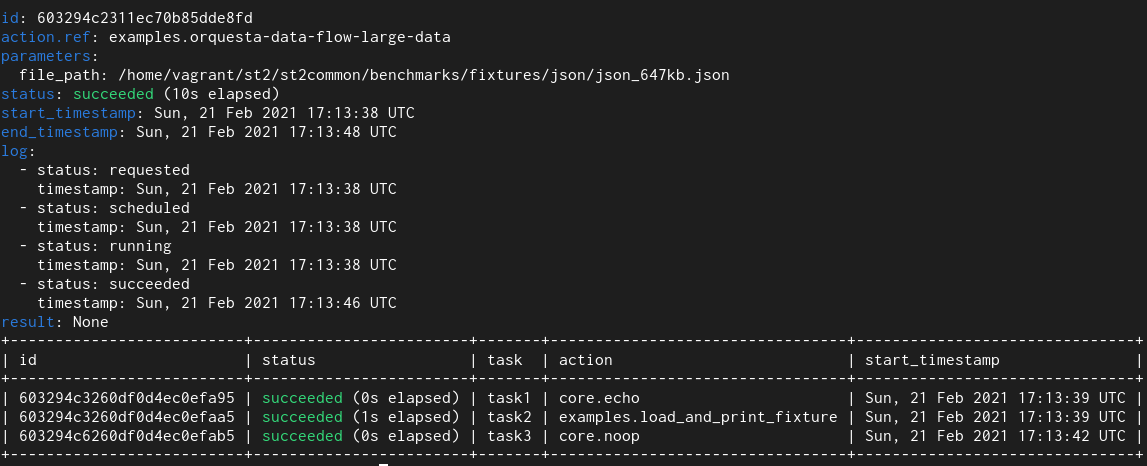
New field type
Here we see that with the old field type it takes 95 seconds and with the new
one it takes 10 seconds.
With workflows we see even larger improvements. The reason for that is that
actual workflow related models utilize multiple fields of this type and also
perform many more database operations (read and writes) compared to simple
non-workflow actions.
You don’t need to take my word for it. You can download StackStorm v3.5.0 and
test the changes with your workloads.
Some of the early adopters have already tested those changes before StackStorm
v3.5.0 was released with their workloads and so far the feedback has been very
positive - speed up in the range of 5-15x.
Other Improvements
In addition to the database layer improvements which are the start of the v3.5.0
release, I also made various performance improvements in other parts of the
system:
Various API and CLI operations have been sped up by switching to orjson for
serializarion and deserialization and various other optimizations.
Pack registration has been improved by reducing the number of redundant
queries and similar.
Various code which utilizes yaml.safe_load has been speed up by switching
to C versions of those functions.
ISO8601 / RFC3339 date time strings parsing has been speed up by switching to
udatetime library
Service start up time has been sped by utilizing stevedore library more
efficiently.
WebUI has been substantially sped up - we won’t retrieve and display very
large results by default anymore. In the past, WebUI would simply freeze the
browser window / tab when viewing the history tab. Do keep in mind that righ
now only the execution part has been optimized and in some other scenarios
WebUI will still try to load syntax highlighting very large datasets which
will result in browser freezing.
Conclusion
I’m personally very excited about those changes and hope you are as well.
They help address one of StackStorm’s long known pain points. And we are not
just talking about 10% here and there, but up to 10-15x improvements for
executions and workflows which work with larger datasets (> 500 KB).
That 10-15x speed up doesn’t just mean executions and workflows will complete
faster, but also much lower CPU utilization and less wasted CPU cycles (as
described above, due to the various conversions, storing large fields in the
database and to a lesser extent also reading them, was previously a very CPU
intensive task).
So in a sense, you can view of those changes as getting additional resources /
servers for free – previously you might have needed to add new pods / servers
running StackStorm services, but with those changes you should able to get
much better throughput (executions / seconds) with the existing resources
(you may even be able to scale down!). Hey, who doesn’t like free servers :)
This means many large StackStorm users will be able to save many hundreds
and thousands of $ per month in infrastructure costs. If this change will
benefit you and your can afford it, check Donate page on how you can
help the project.
Thanks
I would like to thank everyone who has contributed to the performance
improvements in any way.
Thank to everyone who has helped to review that massive PR with over 100
commits (Winson, Drew, Jacob, Amanda), @guzzijones and others who have tested
the changes while they were still in development and more.
This also includes many of our long term uses such as Nick Maludy,
@jdmeyer3 and others who have reported this issue a long time ago and worked
around the limitations when working with larger datasets in various different
ways.
Special thanks also to v3.5.0 release managers Amanda and Marcel.
Amazon Web Services (AWS) recently launched a new product called Amazon
EventBridge.
EventBridge has a lot of similarities to StackStorm, a popular open-source
cross-domain event-driven infrastructure automation platform. In some ways, you
could think of it as a very light weight and limited version of StackStorm
as a service (SaaS).
In this blog post I will should you how you can extend StackStorm functionality
by consuming thousands of different events which are available through Amazon
EventsBridge.
Why?
First of all you might ask why you would want to do that.
StackStorm Exchange already offers many different packs which allows users
to integrate with various popular projects and services (including AWS). In fact,
StackStorm Exchange integration integration packs expose over 1500 different
actions.
StackStorm Exchange aka Pack Marketplace.
Even though StackStorm Exchange offers integration with many different products
and services, those integrations are still limited, especially on the incoming
events / triggers side.
Since event-driven automation is all about the events which can trigger various
actions and business logic, the more events you have access to, the better.
Run a workflow which runs Ansible provision, creates a CloudFlare DNS record,
adds new server to Nagios, adds server to the loadbalancer when a new EC2
instance is started? Check.
Honk your Tesla Model S horn when your satellite passes and establishes a
contact with AWS Ground Station? Check.
Having access to many thousands of different events exposed through EventBridge
opens up almost unlimited automation possibilities.
For a list of some of the events supported by EventsBridge, please refer to
their documentation.
Consuming EventBridge Events Inside StackStorm
There are many possible ways to integrate StackStorm and EventBridge and
consume EventBridge events inside StackStorm. Some more complex than others.
In this post, I will describe an approach which utilizes AWS Lambda function.
I decided to go with AWS Lambda approach because it’s simple and straightforward.
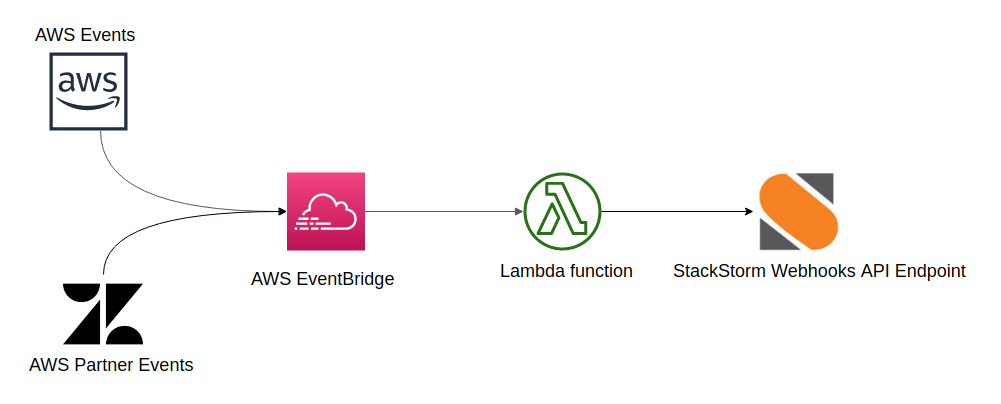
It looks like this:
AWS / partner event -> AWS EventBridge -> AWS Lambda Function -> StackStorm Webhooks API
Event is generated by AWS service or a partner SaaS product
EventBridge rule matches an event and triggers AWS Lambda Function (rule target)
AWS Lambda Function sends an event to StackStorm using StackStorm Webhooks
API endpoint
1. Create StackStorm Rule Which Exposes a New Webhook
First we need to create a StackStorm rule which exposes a new eventbridge
webhook. This webhook will be available through
https://<example.com>/api/v1/webhooks/eventbridge URL.
You can have as many rules as you want with the same webhook URL parameter.
This means you can utilize the same webhook endpoint to match as many
different events and trigger as many different actions / workflows as you want.
In the criteria field we filter on events which correspond to new EC2
instance launches (eventName matches RunInstances and eventSource
matches ec2.amazonaws.com). StackStorm rule criteria comparison
operators are quite expressive so you can also get more creative than that.
As this is just an example, we simply write a body of the matched event to
a file on disk (/home/stanley/st2.webhook.out). In a real life scenario,
you would likely utilize Orquesta workflow which runs your complex or less
complex business logic.
This could involve steps and actions such as:
Add new instance to the load-balancer
Add new instance to your monitoring system
Notify Slack channel new instance has been started
Configure your firewall for the new instance
Run Ansible provision on it
etc.
2. Configure and Deploy AWS Lambda Function
Once your rule is configured, you need to configure and deploy AWS Lambda
function.
I decided to use Lambda Python environment, but the actual handler is very
simple so I could easily use JavaScript and Node.js environment instead.
git clone https://github.com/Kami/aws-lambda-event-to-stackstorm.git
cd aws-lambda-event-to-stackstorm
# Install python-lambda package which takes care of creating and deploying# Lambda bundle for your
pip install python-lambda
# Edit config.yaml file and make sure all the required environment variables# are set - things such as StackStorm Webhook URL, API key, etc.# vim config.yaml# Deploy your Lambda function# For that command to work, you need to have awscli package installed and# configured on your system (pip install --upgrade --user awscli ; aws configure)
lambda deploy
# You can also test it locally by using the provided event.json sample event
lambda invoke
You can confirm that the function has been deployed by going to the AWS console
or by running AWS CLI command:
2. Create AWS EventBridge Rule Which Runs Your Lambda Function
Now we need to create AWS EventBridge rule which will match the events and
trigger AWS Lambda function.
AWS EventBridge Rule Configuration
As you can see in the screenshot above, I simply configured the rule to send
every event to Lambda function.
This may be OK for testing, but for production usage, you should narrow this
down to the actual events you are interested in. If you don’t, you might get
surprised by your AWS Lambda bill - even on small AWS accounts, there are tons
of events being being constantly generated by various services and account
actions.
3. Monitor your StackStorm Instance For New AWS EventBridge Events
As soon as you configure and enable the rule, new AWS EventBridge events
(trigger instances) should start flowing into your StackStorm deployment.
You can monitor for new instances using st2 trace list and
st2 trigger-instance list commands.
AWS EventBridge event matched StackStorm rule
criteria and triggered an action execution.
And as soon as a new EC2 instance is launched, your action which was defined in
the StackStorm rule above will be executed.
Conclusion
This post showed how easy it is to consume AWS EventBridge events inside
StackStorm and tie those two services together.
Gaining access to many thousand of different AWS and AWS partner events
inside StackStorm opens up many new possibilities and allows you to apply
cross-domain automation to many new situations.
In this post I describe how I set up weather station, live camera feed and
liveatc.net audio feed for our little airstrip.
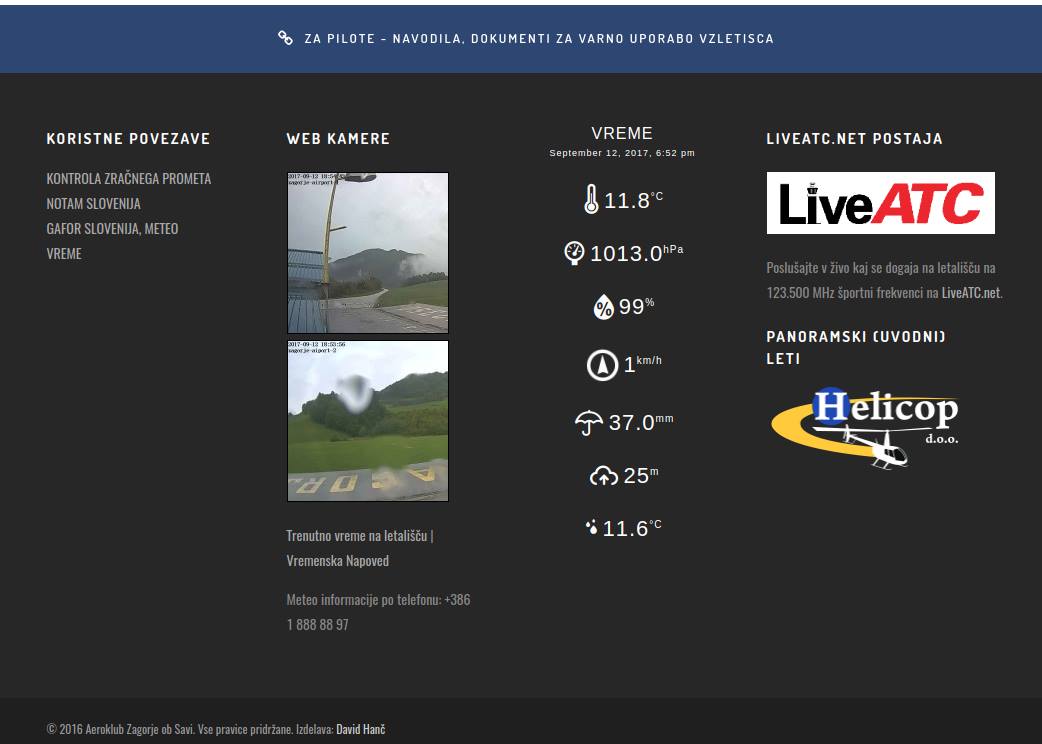
Real-time camera feed and weather information displayed on the club website.
Background
A while back I moved from Ljubljana to a small town around 30 km East of
Ljubljana. Before I moved here, I used to fly small single engine planes (for
fun) out of Ljubljana Airport and Portoroz Airport.
This means that both of those two airports are now too far to regularly fly
out of them. With no traffic, it would take around 1 hour to get to Ljubljana
Airport and around 2 hours to get to Portoroz Airport. Those two hours can
easily turn into 3 hours during peak summer time when highway is full of holiday
travelers (done that once, have no plans to repeat it).
Regular flying is very important to stay current and be a safe pilot so I needed
to find a new airport which is closer by. Luckily there are two airports in
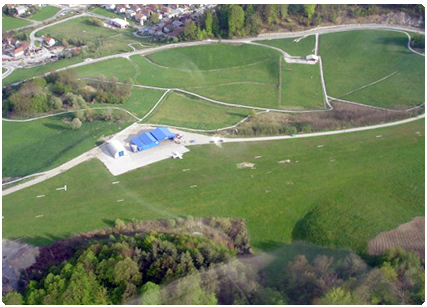
the 30 minutes driving distance - Airport Zagorje ob Savi1 and Airport
Sentvid Pri Sticni.
Zagorje ob Savi Airport (Vzletisce Ruardi).
Both of themare small, un-towered general aviation airports with a relatively
short grass runway.
For some reason, I decided to visit Zagorje ob Savi Airport and club first. There I
met a bunch of dedicated, friendly and welcoming people. They were the main
reason I decided to make this my new “home airport”.
Both of the airports I used to fly from, were bigger towered international
airports (for Slovenian standard, but in global scheme of things, they are still
really small and low traffic airports). Compared to those airports, this small
airport also feels a lot more casual, social and homey[^2].
As a big DIY person, I really love connecting / automating / improving things
with technology, so I also wanted to bring some of those improvements to the
airport.[^7]
In this post you can learn a little about our setup - notably our weather
station, web camera feed and LiveATC audio feed.
Internet and Networking Setup
To be able to add some technological improvements to the airport, we first
needed an internet connection. Sadly there is no fixed internet connection at
the airport, but there is good 3G / 4G coverage so I decided to re-purpose one
of my old Android phones to act as an access point.
I purchased a local prepaid plan with 50 GB monthly data cap and utilized
tethering functionality on an Android phone. So far, the whole setup has been
online for almost a month and we haven’t encountered any issues yet.
Based on the data usage calculations I did[^4], 50 GB should also be plenty.
Because the devices are behind NAT and all the incoming connections and ports
are blocked, I set up an SSH tunnel and port forwarding from a Rasperry Pi
which is behind NAT to an outside cloud-server to which I have access. This way
I can tweak and change various settings, without needing to be physically
present at the airfield.
Weather Station
Weather is one of the most important factors for flying (especially for small
single engine planes in VFR conditions) so getting a weather station was the
first thing I did.
It’s also worth noting that the airfield already had a wind sock before. Since
wind is a very important factor in flying, windsock is one of the many mandatory
things a place needs to be officially classified as an airfield or an airport.
I did some research and I decided to purchase a Fine Offset WH2900 weather
station.
Here is a list of minimum featuresthat a weather station needs to have for me to
consider the purchase.
temperature, dew point data
weather data (direction, speed)
pressure data
rainfall data - nice to have, but not mandatory
ability to easily fetch data via USB or similar, or ability to automatically
send data to the internet
Fine Offset WH2900 weather station, sold under various different brands and names.
This weather station offered all these features and based on the specifications and
reviews I read online, it offered the best price / performance ratio in this range
(there is of course no upper limit for the price and you could easily spend more than
1000$ for a more professional weather station).
It’s also worth noting that Fine Offset is a Chinese OEM and I purchased the station
from a German company on Amazon under a different name (there are many
companies which sell those weather stations under their own brand).
Luckily, the tower at the airport already had an antenna pole on which we could
install the station. The location of the weather station is one of the most
important factors if you want accurate data. Trees, houses and other obstacles
in the proximity can all affect the readings.
weathe station installing data tower
The pole itself offered a good location, because it’s quite high (around 6
meters) and relatively far from things which could affect the readings.
The setup itself was simple, because the weather station only needs to be
connected to the wireless access point and configured to send data to Weather
Underground.
Sending data directly to WU is good because it’s easy to set up, but it also
means you are locked-in to an online service and there is no official way for
the weather station to send data to your personal server or directly grab data
from it.
As a big open-source proponent and believer that everyone should have access to
their own data, this was especially a big downside for me. This and lack of
security are also one of the main reasons why I’m so skeptical and worried about
the whole IoT movement.
Luckily, there is a great open-source project called weewx out there which
allows you to fetch data from the station. This project retrieves data from the
weather station by sniffing and reverse engineering the network traffic sent to
WU by the weather station.
Now that the station was set up, we can easily see this data in real-time on
the LCD display which also acts as a base station and online on
Weather Underground.
Real-time weather data as shown on Weather Underground.
It would also come handy for this data to be available in concise form via text
message and over the phone so I decided to implement “poor man’s ATIS / AWOS”.
For that, I utilized Weather Underground API, some Python and Plivo telephony
service. Python script fetches real-time data using the WU API, caches it
and process it so it works with Plivo text-to-speech API.
I originally tried to use Twilio as I had experience using it in the past,
but it couldn’t get it to work with a Slovenian inbound phone number. I was
able to reach the phone number if I used Skype call or foreign phone number,
but none of the Slovenian telephony providers were able to route phone calls to
it.
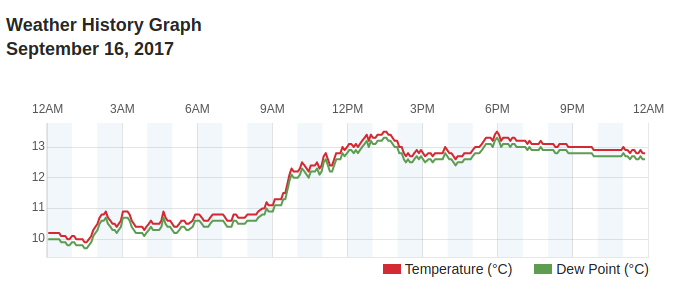
In addition to this data (wind, pressure, temperature / dew point) being useful
to flying, we can now also observe various short and long term weather patterns
and trends. If you are a bit of a weather geek like myself, that’s quite cool.
Very small temperature and dew point spread? Very likely there is fog and low clouds at the airfield.
Web Cameras
Ability to view real-time weather information is useful, but it would be even
better if you could also see in real-time what is going on at the airport.
And that’s where the web cameras come in.
In addition to allowing you to see what (if anything) is going on at the
airfield, cameras are a great addition to real-time weather information when
you are evaluating weather. They allow you to see real-life conditions and
things such as cloud coverage, fog / mist, etc.
I already had a bunch of Foscam C1 wide-angle HD cameras at home so I
decided to lease / move two of them to the airfield.
Foscam C1. A relatively in-expensive IP camera which offers decent image quality.[^5]
Since the cameras are meant to be used indoors, we installed them inside the
tower to protect them from bad weather and vandalism. The picture is not crystal
clear because there is a privacy foil on the glass which makes the picture look
a bit darker then normal and there is also some glare from the sun depending on
the sun position, but it’s good enough for now.
Now that the cameras were installed, they needed to be configured to stream /
send images to the internet. This camera and many other IP cameras allow you to
connect to the camera to view stream in real-time or to periodically upload
image to a FTP server.
Example image from one of the cameras.
It’s worth noting that this and most other IP cameras are very insecure by
default and in many cases, can’t be made more secure (no SSL, many security
vulnerabilities, etc.).
This is not so problematic if camera is located in a public place such as is
the case here, but I still decided to make it as secure as possible.
The cameras are behind NAT and all the incoming connections and ports are
blocked which solves part of a problem. Second part is solved by utilizing
“periodically upload image” to FTP functionality. Sadly the camera only
supports FTP (insecure) and not FTPS (secure) so I needed to get a bit
creative.
I configured the cameras to send images to an FTP server which is running inside a
local network on a Rasperry Pi 3 based Linux server. Rasperry Pi then
periodically sends those images to a cloud server over FTPS.
This cloud server is also used to automatically process those images (create
thumbnails, optimize image size, create time-lapse gifs, add watermark, etc.)
and serve them over HTTPS.[^6]
Those real-time camera images can be accessed on the website. In addition
to the real-time images, you can also view time-lapse videos for the past hour
on the website.
Time-lapse videos are generated from raw camera images every 10 minutes for
the period of now - 60 minutes. Serving the time-lapse videos presents some unique
challenges. A lot of people will access the website through a phone which can’t
(easily) play videos so instead of generating a video file, I decided to
generate an animated .gif image.
The problem with that is that animated gif is really a poor storage format for
what is basically a video, so I needed to experiment a bit with ImageMagick
command line options to find the combination which offers the best quality / size
ratio.
By default, generated .gif size was around 28-45 MB, but I managed to get it
down to 5-12MB with a reasonable quality.
In addition to the time-lapse videos which are generated automatically for the past
hour, raw camera images can be used to generate time-lapse videos of the
various interesting time frames (e.g. when a storm passes, etc.). An example
of such time-lapse video can be found below.
LiveATC audio feed
Now that the weather station and cameras were in place, the only thing missing
was real-time audio feed from the airport.
The airport is un-towered which means there is no ATC, but we do have UNICOM
/ CTAF station on a local sport frequency of 123.500 MHz. This station is
active when there are multiple people flying and offers traffic and runway
condition advisories.[^3]
Nowadays it’s very easy very to set up software based radio receiver by utilizing a
USB DVB-T TV tunner dongle based on the RTL2832U chipset. The chip covers a
very wide frequency range (24 - 1766 MHz), but if you want good sound signal
quality you need to use an antenna specifically optimized for a frequency range
you want to receive.
In this case, that is the airband frequency range (108 - 140 MHz). I purchased
an inexpensive 30$ airband whip antenna which seems to be doing a good job of
receiving transmission from the airplanes in vicinity. It’s also worth
noting that VHF frequencies signal follows line of sight propagation which means
the antenna itself should be mounted as high as possible and away from any
obstructions.
To receive the signal and stream it to the internet, I connected USB dongle to
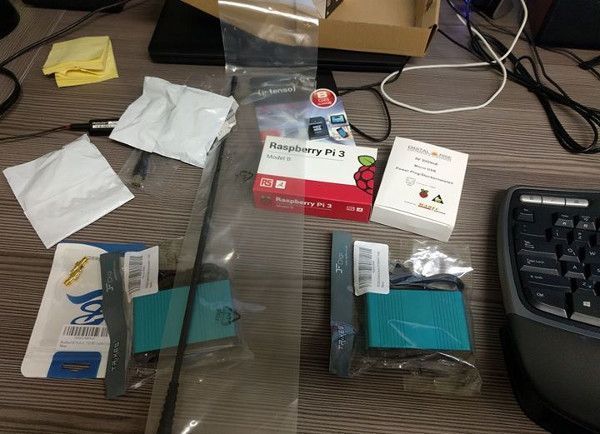
Rasperry Pi model 3, installed rtl-sdr library and RTLSDR-Airband.
Some of the used equipement.
RTLSDR-Airband is an open-source Linux program optimized for AM voice channel
reception and sending this data to online services such as liveatc.net.
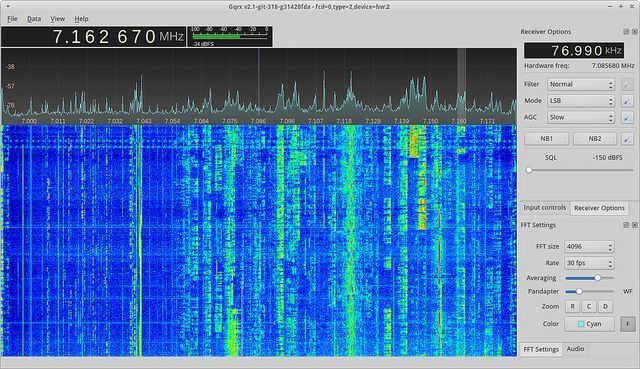
Before setting up Rasperry Pi, I connected USB dongle to my computer and used
open source Gqrx SDR program which allows you to visualize received
signal (strength, noise, etc.) and tweak various parameters.
Gqrx is a great open-source program for software defined radio.
This was an important step, because simply connecting dongle to the Rasperry Pi
and setting the frequency in rtl airband config usually doesn’t yield good
results out of the box.
Gqrx allows you to find the optimal frequency and other settings (gain, squelch,
etc.) where the signal is the strongest and audio quality is the best.
If the whole thing wouldn’t work out well, I also had a backup plan. Backup
plan involved using a USB sound card and connecting headphones output on the
handheld airband radio / transceiver directly to the line-in on the sound card.
Once I found the best settings, I plugged dongle to Rasperry Pi, configured
rtl_airband settings and configured rtl_airband to stream audio to my self
hosted Icecast server to test it out.
After I confirmed everything was working, I contacted people at LiveATC
for settings for their Icecast server so our feed would also be included on
LiveATC.
There were some issues because our airfield was the first one without an ICAO
identifier, but they were very accommodating and in the end we managed to find
a good compromise. The compromise was listing our feed under Ljubljana / LJLJ
page.
Our feed (including the archives) is available on LiveATC.net.
Future Improvements
The whole setup has been running less than a month so far and I already have
some ideas for future improvements and additions.
Traffic Feed
Now that we have live audio feed, the only thing missing is a life traffic
feed - ability to see which airplanes are flying in the area.
There are already services such as flightradar24 out there which allow you
to track aircraft movements in real time, but mostly, they only track
commercial traffic via ADS-B (they also cover some GA traffic, but because of
their receiver locations, they only cover airplanes flying at higher
altitudes).
There are a couple of ways to track aircraft movements:
FLARM (proprietary protocol, mostly used in gliders)
ADS-B provides the most information, but it’s not widely used here in Slovenia
(yet).
Mode C and Mode S transponders are more common here. Mode C is not all that
useful because it only provides altitude, but Mode S also provides other data.
Both of those approaches use the same frequency (1090 MHz) so it’s possible to
receive those signals using the same RTL-SDLR USB dongle which is used to
receive audio signal for LiveATC feed.
So in theory, all it takes is a USB RTL-SDLR dongle plugged to Rasperry Pi,
antenna optimized for this frequency range and some software on Rasperry Pi
which interacts with RTL-SDLR and processes the received signal.
In fact, there are already some projects such as PilotAware out there so
we might be able to utilize existing software and won’t need to write our own.
pilotaware radar screen / traffic screen
Power Bank Based UPS
All the devices are connected to the electrical network and haven’t had any
power outage yet, but outages can happen so it would be good to be able to
connect all the devices to a UPS.
Luckily, all the devices consume very little power so it should be possible to
make a simple UPS a USB power bank which supports pass through charging and has
a capacity of at least 15.000 mAh.
Equipment List and Costs
For the reference, here is a full list of the physical equipment used:
Fine Offset 2900 Weather Station - $200$
2x Foscam C1 - 2x ~70$ (used to be around 100$ when I first got it,
but now you can get it for much less)
Rasperry Pi model 3, enclosure, micro SD card - ~80$
Whip airband antenna - ~25$
NooElec USB RTL-SDR dongle - ~30$
USB sound card - ~30$ (optional and only needed if you want to use airband
transceiver / scanner instead of the DVB-T tunner for receiving audio)
MCX to BNC adapter - ~10$
In addition to that, other costs include 10$/month for a cloud server and
17$/month for a 4G data plan.
doesn’t meet all the local Civil Aviation Authority rules and standards for an
airport, most notably, the minimum runway length.
[^2]: “casual” and “homey” don’t need to mean unsafe. For me, safety is the
most important factor and always comes first so I never compromise on it.
[^3]: Being a non-ATC facility means it can only offers advisories and
recommendations, but no clearances or similar. Pilots perform their actions
based on their discretion at their own risk. It would be foolish to do so, but
pilots can also chose to ignore those recommendations if they wish so.
[^4]: New images are uploaded from both of the cameras every 10 seconds, and
image size is around 80-150 KB, the audio stream is 16kbps and weather station
uses negligible amount of data. For the worst case scenario, this gives a
consumption of less than 1.1 GB per day.
[^5]: As noted before, most of the popular IP cameras and other IoT devices have
a very poor security record so you should be very careful when you install them
in a private place and connect them to the internet. Ideally they should be deployed
in an isolated network which doesn’t have access to the internet.
[^6]: Free Let’s Encrypt SSL certificate is used and CloudFlare is used
as a reverse proxy to act as a caching layer in-front of the webserver.
[^7]: Flying itself is rewarding and a lot of fun, but being a tech person myself,
working on side projects like this one is even more satisfactory and fun than
flying :)
Well, technically it’s an airstrip (vzletisce) and not an airport. It ↩
I have recently pushed support for OpenStack Identity API v3 to Libcloud
trunk. In this blog post I’m going to have a look at the motivation for that,
changes which were involved and show some examples of how you can utilize those
changes and newly available features.
What is OpenStack Keystone / Identity service?
OpenStack Keystone is an OpenStack project that provides identity and
authentication related features to OpenStack projects such as Nova.
The project started as a simple service which only provided basic
authentication features, but it has since grown into a fully fledged and
powerful identity management service.
The latest version supports advanced user management, multiple projects,
complex ACLs and more.
Future release will also include a Keystone to Keystone federation feature
which will makes things such as a seamless cross-cloud authorizations possible.
Motivation
Support for OpenStack Nova was first added to Libcloud back in 2011. First
version only included support for a simple token based authentication.
Since then a lot has changed and new (and more flexible) OpenStack Keystone
versions have been released. We have been pretty good at following those
changes and support for authenticating against Keystone API v2.0 has been
available in Libcloud for a long time.
Those changes worked fine, but the problem was that not much thinking went
into them and support for multiple Keystone versions was added after the fact.
This means that the code was hacky, inflexible, hard to re-use and extend.
Luckily, those things were (mostly) hidden from the end user who just wanted
to connect to the OpenStack installation. They only became apparent if you
wanted to talk directly to the Keystone service or do anything more complex
with it.
For one of the features we are working on at DivvyCloud, we needed support
authenticating and talking to OpenStack Keystone API v3. Since Libcloud
didn’t include support for this version yet, I decide to go ahead and add it.
All of the “hackiness” of the existing code also became very apparent when I
wanted to add support for API v3. Because of that, I have decided to spend
more time on it, do it “the right way” and refactor the existing code to make
it more re-usable, extensible and maintainable.
Refactoring the existing code
Before my changes, all of the logic for talking to Keystone, handling of the
token expiration, re-authentication, etc. was contained in a single class
(OpenStackAuthConnection).
To authenticate, there was one method per Keystone API version (authenticate_1_0,
authenticate_1_1, authenticate_2_0_with_apikey,
authenticate_2_0_with_password). This means there was a lot of duplicated
code, the code was hard to extend, etc.
I went ahead and moved to a “base class with common functionality” + “one class
per Keystone API version” model. This approach has multiple advantages over the
old one:
the code is easier to re-use, maintain and extend
version specific functionality is available via methods on the version
specific class
less coupling
Some other notable changes are described bellow.
Identity related code has been moved to a separate (independent) module
All of the identity related code has been moved from libcloud.common.openstack to
a new libcloud.common.openstack_identity module.
This module reduces coupling between general OpenStack and Identity related
code and makes code re-use and other things easier.
Improvements in the service catalog related code
Before my changes, parsed service catalog entries were stored in an
unstructured dictionary on the OpenStackServiceCatalog class. To make
things even worse, the structure and the contents of the dictionary differed
based on the Keystone API version.
Dynamic nature of Python can be a huge asset and can make development and
prototyping faster and easier. The problem is that when it’s abused /
overused it makes code hard to use, maintain and reason about. Sadly, that’s
pretty common in the Python world and many times, people tend to over-use
dictionaries and base their APIs around passing around unstructured
dictionaries.
I refactored the code to store service catalog entries in a structured format
(a list of OpenStackServiceCatalogEntry and
OpenStackServiceCatalogEntryEndpoint objects).
Now only the code which parses service catalog responses needs to know
about the response structure. The user itself doesn’t need to know anything
about the internal structure and the code for retrieving entries from the
service catalog is API version agnostic.
Addition of the administrative related functionality
In addition to the changes mentioned above, OpenStackIdentity_3_0_Connection
class now also contains methods for performing different administrative related
tasks such as user, role, domain and project management.
Examples
This section includes some examples which show how to use the newly available
functionality. For more information, please refer to the docstrings in the
openstack_identity module.
Authenticating against Keystone API v3 using the OpenStack compute driver
This example shows how to authenticate against Keystone API v3 using the
OpenStack compute driver (for the time being, default auth version used
by the compute driver is 2.0).
This example shows how to talk directly to OpenStack Keystone API v3 and
perform administrative tasks such as listing users and roles.
frompprintimportpprintfromlibcloud.common.openstack_identityimportOpenStackIdentity_3_0_Connectionfromlibcloud.common.openstack_identityimportOpenStackIdentityTokenScopedriver=OpenStackIdentity_3_0_Connection(auth_url='http://<host>:<port>',user_id='admin',key='<key>',token_scope=OpenStackIdentityTokenScope.PROJECT,tenant_name='admin')# This call doesn't require authentication
pprint(driver.list_supported_versions())# The calls bellow require authentication and admin access
# (depends on the ACL configuration)
driver.authenticate()users=driver.list_users()roles=driver.list_roles()pprint(users)pprint(roles)
A quick note on backward compatibility
If you only use OpenStack compute driver, those changes are fully backward
compatible and you aren’t affected.
If you use OpenStackAuthConnection class to talk directly to the Keystone
installation, you need to update your code to either use the new
OpenStackIdentityConnection class or a version specific class since
OpenStackAuthConnection class has been removed.
This is just a quick heads up that I will be attending ApacheCon North
America, 2014 in Denver, Colorado next month.
I will be giving two talks. First one is titled 5 years of Libcloud. This
is retrospective talk where I will tell a story of how Libcloud grew from a
small project originally developed for the needs of Cloudkick product into
a fully fledged and relatively popular Apache project.
I will go into details on some of the challenges we faced, what we learned
from them and how we grew the community and the project.
To give you some context, I first need to say that I’m a person who loves to
move fast and loves lean and efficient approaches and teams. On top of that,
I also have zero tolerance for unnecessary / useless processes and deep and
mostly useless hierarchies.
All of that means I don’t see myself a big company person, where having useless
processes, which among many other things, slow innovation down is usually the
norm.
Apache is a relatively big organization which means it has it’s own fair share
of (useless) proceses. A lot of “new era” developers who grew up with Github
also consider Apache as slow, inflexible and place where projects go to die1.
In this talk I will go into details why this is not totally true and how Apache
is (slowly) becoming more flexible and changing to adopt those new work-flows.
On top of that, I will also give some examples on how you can adopt those new
work-flows, iterate fast and still receive all the benefits from being an
Apache project. Those examples will be taken directly from the things we have
learned at the Apache Libcloud project.
Depending on how many people will attend the talk, I think it would also be
very interesting to turn this into a panel where other people can contribute
their ideas and we can discuss how to reduce barriers even further and make
Apache more attractive for “new-era projects”.

 This screenshot shows that the new field type (json dict field) is
~10x faster over EscapedDynamicField and ~15x over EscapedDictField when saving 4 MB field
value in the database.
This screenshot shows that the new field type (json dict field) is
~10x faster over EscapedDynamicField and ~15x over EscapedDictField when saving 4 MB field
value in the database.
 This screenshot shows that the new field is about ~7x faster
over EscapedDynamicField and ~40x over EscapedDictField..
This screenshot shows that the new field is about ~7x faster
over EscapedDynamicField and ~40x over EscapedDictField..